Recording and telehealth
Record a Live Session
Select a template and patient. Record the session. Add scales and codes. End the session and review the note.
Before you start
The recorder runs in any modern browser at nextvisit.app/recorder. The first time you start a session, the browser asks for microphone access. Approve it once. Telehealth visits also prompt you to share the call’s browser tab when you click Start Recording. That share prompt is per session and comes back on every pause-and-resume cycle. Nothing to install.
Step 1: Open the recorder and pick a template
Open the recorder and the template gallery loads. Your most recent pick is pinned at the top under Recently Used for one-click reuse. Below that, Your Templates shows any custom templates your workspace has authored. The full library lives in the All Templates grid, with a search input that filters live as you type.
Click a card to advance to session setup. If you grabbed the wrong template, the chosen one appears as a chip at the top of the next screen, and clicking it sends you back to swap.
Step 2: Pick a patient and review the auto-populated context
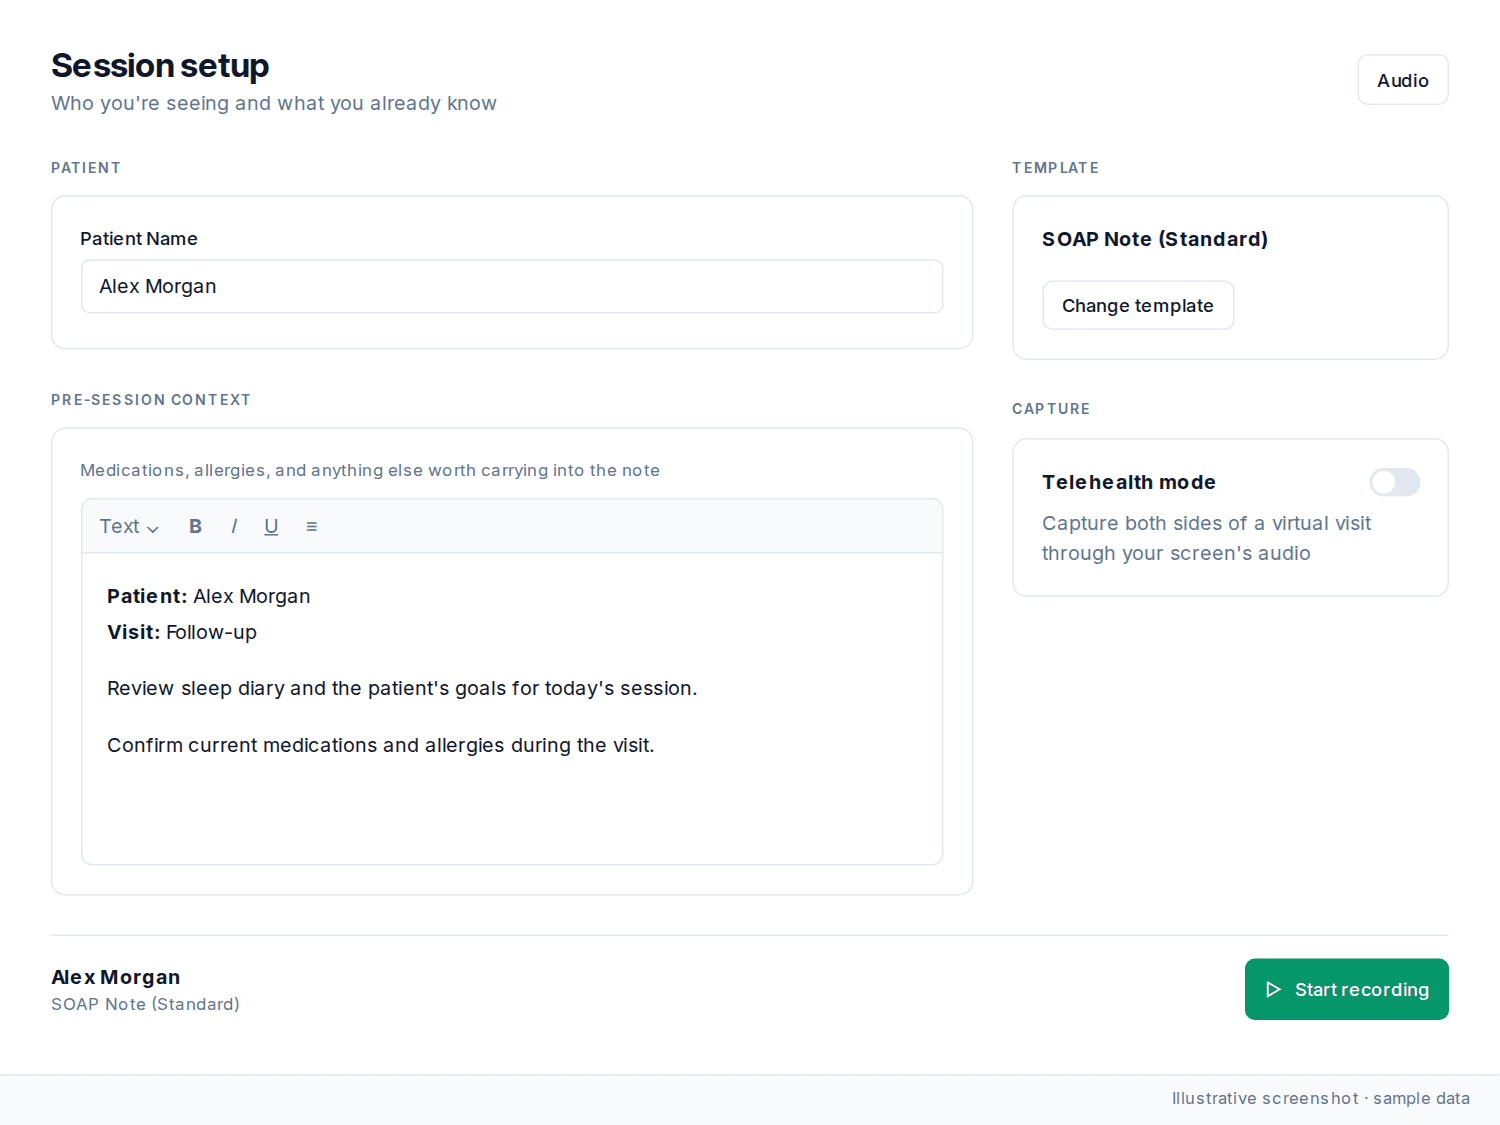
Search for the patient by name at the top of session setup. If you need a new chart, click Create Patient. See Create a patient from search. When you select a patient, the context editor shows today’s date, the current provider, the patient’s name, date of birth, and active medications. Edit these fields or add information that AriaMD needs for the note.
If you want AriaMD to use patient documents, select them under Documents during session setup. AriaMD uses them during the session. After the session, they appear on the Documents tab of the encounter.
The Capture card has a Telehealth mode switch. The text under it reads: Capture both sides of a virtual visit through your screen's audio. Turn on the switch before you click Start Recording.
Step 3: Start recording
Click Start Recording. The view switches to live transcription, the status dot turns red, the timer starts, and your first words begin to appear. As you speak, the in-progress phrase builds in cyan below the latest finalized line, with a blinking cursor. Finalized lines stamp themselves with the wall-clock time and stack above.
Add context, scales, files, and codes mid-session
The right-hand action panel stays available throughout the session. Six tools, each one click away, without leaving the recorder.
Add Note drops a non-spoken context note into the transcript at the current timestamp. Use it for things the AI should know but should not transcribe verbatim, like “patient nodded but did not verbalize agreement” or “appears alert and oriented x3, no acute distress.” Submitted notes pin to the top of the transcript as a labeled CONTEXT NOTE block, separate from the live conversation.
Click Scales or press M to open Add a scale or exam. Then:
- Search by name, abbreviation, or topic.
- Enter the answers you have.
- Click Generate.
- Review the preview.
- Click Insert.
The result appears in the session and under Scales & Exams on the encounter and patient chart. See Scales and exams.
Coding lets you pre-stage ICD-10 diagnostic codes and billing codes during the visit, before AriaMD’s auto-suggestions land on the encounter detail. Type a code or a description, multi-select from the dropdown, and save. Selected codes appear as removable pills above the search.
The remaining three tools live in the same panel:
-
Context opens the same rich-text editor you used at session setup, so you can edit the AI’s grounding mid-session. Saves are live.
-
Files uploads a PDF (lab results, genetic tests, or other documents) for AriaMD to reference. Link a patient first. This is separate from Documents on session setup, which sources files already in the patient’s chart.
-
Audio opens audio settings to change microphone or toggle echo cancellation, noise suppression, and auto gain control mid-session.
Pause and resume
Press Space or click the Pause button to pause. The status dot flips to yellow, the listening pill changes to Paused, and the transcript stays put. Press Space again or click Resume to pick back up. Audio settings changes only take effect after a pause-and-resume cycle, which is the supported way to switch microphones mid-visit.
Keyboard shortcuts
| Key | Action |
|---|---|
Space | Pause / Resume |
N | Add a context note |
M | Scales |
F | Open Files (Upload attachments) |
⌘F | Search transcript |
⌘. | End the recording |
When you are done
Click End or press ⌘. to finish. The recorder hands the session off to the encounter detail page and runs the AI analysis pipeline in front of you: Creating Timeline Events, Generating Note, Suggesting Codes, and so on, up to seven steps when documents are linked. The card turns green at the end with Encounter Processed.
The encounter page has Note, Transcript, Peer Review, and Context tabs. A Documents tab appears if you selected files at setup or uploaded files during the session. The sidebar shows AriaMD’s ICD-10 and billing suggestions and the codes you added. It also shows scales and exams from the session. See the features overview for more information.
On an unsigned note, the row Tell Aria what to change… edits that draft. See Edit a note with Aria.
Telehealth mode
On Zoom, Doxy, Teams, or Google Meet, a mic-only recording catches the other side as muffled speaker bleed. Telehealth Mode captures the patient’s audio from the call’s browser tab at line level and mixes it with your microphone.
Turning it on
At session setup, turn on Telehealth mode in the Capture card. With the switch on, this notice appears: When recording starts, pick "Share system audio" or "Share tab audio" in the browser prompt so both sides of the visit are captured.
When you click Start Recording, the browser’s native screen-share picker appears. Pick the tab running the video call and check Share tab audio (Chrome’s wording; some browsers say Share system audio). Confirm. Recording begins, and the transcript captures both sides of the call.
If you forget to check the audio box, the recorder catches the empty audio stream and silently falls back to microphone-only recording. The session continues, but the line-level patient capture is gone for the rest of the visit.
Pause and resume re-prompts the share dialog
Each pause-and-resume cycle tears down the screen capture and re-runs the picker. On long telehealth visits with several pauses, the share dialog comes back every time you resume. Pick the same tab and check the audio box again to keep capturing both sides.
If you click “Stop sharing” mid-session
The browser shows a persistent “Stop sharing” indicator while you are sharing the tab. Clicking it does not stop the recording, but the patient’s audio drops out from that point and the recorder continues with microphone-only audio for the rest of the session. To restore patient capture, end the recording and start a new one.
Browser support
Telehealth Mode requires desktop Chromium browsers: Chrome, Edge, Brave, Arc, Opera. Firefox shows the toggle but the share picker does not offer an audio checkbox, so the recorder falls back to microphone-only. Safari support is partial and inconsistent. The toggle is not rendered on mobile (iOS Safari and Android Chrome do not support tab-audio capture).
Privacy
In real-time recording mode, no audio file is saved on either Nextvisit’s servers or the video platform’s. Only the text transcript is persisted. The video call platform itself (Zoom, Doxy, Teams) is unaffected: Telehealth Mode is browser-level audio capture from the tab you point it at, not an integration with the video service.
Troubleshooting
Mic not detected
Check the browser’s site permissions for nextvisit.app and confirm microphone access is granted. If it is, open Audio Settings from the gear icon, switch to a different microphone in the dropdown, and click Test Mic to confirm levels move. If the recorder is already running and you change microphones, pause and resume to apply the change.
Transcript stops mid-session
Check the listening pill in the upper right. If it flipped to Paused, press Space to resume. If it shows a connectivity error, the recorder queues audio locally and resumes transcription automatically when the connection returns. Nothing is lost during the gap.
Recording ended unexpectedly
Sessions save up to the time of disconnection. Open the recorder again and select the same patient. The unfinished encounter appears under Resume. Continue the session. AriaMD joins the segments when you click End.
To import recordings from a Pocket device, use Pocket Integration.
Was this article helpful?
Still stuck? Our team answers in the messenger.