AriaMD and automations
AI Tasks and Automations
Schedule an AriaMD task. Add actions and conditions. Review each run.
The Automations page lists your AI tasks for the current clinic. A task runs on a schedule or after an event.
Create a task
- Open Automations.
- Click New Task. The page title is New automation. The text says: Set the trigger, ordered actions, and run controls.
- On Setup, enter a Name. The Task card says: A prompt runs by default when no actions are listed.
- Enter a Default prompt. The field says Describe what AriaMD should do. A workflow with actions does not need this prompt. AI actions use it unless you set an override.
- Select ultra, normal, fast, or budget for Intelligence level. The card shows Ultra, Normal, Fast, or Budget. See Plans and Pricing for credit tiers.
- Select In app, Email, or Both for Notify via. See Notifications for inbox delivery.
- Under Trigger, select Scheduled or Event occurs for Run when.
- Under AI tools, select the tools for the task. The options are Patients, Encounters, Documents, Web search, and External portals. Patients and Encounters are on by default. Configured workflows use read tools and require approval for clinical proposals. The default AI workflow can use file tools and external portals.
- Open Workflow to add actions. Leave the list empty to run the default AI task.
- Open Controls to set approvals and retention.
- Click Save automation.
An empty action list shows Default AI task and The task prompt runs when this list is empty. The default run can use External portals. It can ask for a one-time code. If you add an action, External portals turns off. The task then runs the listed actions.
Triggers
For Scheduled, select once, daily, weekly, or monthly under Frequency. Set Time and Timezone. For a weekly task, set Day of week. For a monthly task, set Day of month from 1 to 28.
Event occurs lists:
- Encounters: Encounter Signed, Note Processed, Service Location Assigned, Billing Code Assigned
- Documents: Document OCR Complete
- Fax: Fax Received, Fax Delivered
- Forms: Form submitted. This event occurs when a form submission runs an automation with an AI task step.
Workflow
Click Add action. The heading says: Run in the order shown. If the list has actions, the task runs those actions. Move an action up or down to change the order. Remove an action to exclude it.
Action types:
- Execute AI and Agent
- Webhook
- Notification: This action adds an Automation message to the notification list.
- Find record
- Update record
- Create patient
- Create encounter
- Set result and Set variable
- Script: The editor says: Return a JSON-compatible value synchronously. Scripts have no network access and require a configured sandbox image.
- Parallel group
- Stop
Select Run only when a condition matches to open the condition editor. The operators are:
- Always, All conditions, Any condition
- Exists, Is null, Is true, Is false
- Equals, Greater than, Less than, Contains
- Before, After, Weekday, Time between
- AI decision
Select Invert to reverse the result.
On error is Stop workflow, Continue, or Run fallback actions. Inside a parallel group it can also be Stop group.
The side panel is Template reference.
Controls
For patients, encounters, webhooks, and email, select Require approval, Auto approve, or Allow. Patients and encounters use Require approval by default. Webhooks and email use Allow by default. An empty workflow keeps the default AI permissions.
The Approvals tab on the Automations page lists proposals. Each card shows What, Why, and Impact. Click Approve or Deny on a card. An empty page says No approvals to review.
If Duration is empty, Run retention keeps the run data. The hint reads Keep forever. A duration must be at least 7 days. The categories are context, variables, outputs, logs, approvals, and runs.
Secrets
The Secrets page stores values for actions that send data. The page says to use tags as {{ secrets.TAG }}. Click New secret to enter Label, Tag, Value, and Expires on. The saved value stays hidden.
Manage tasks
On the Automations page, select All, Active, Paused, or Completed to filter tasks. Each card shows the status, next run, last run, and run count. If the last run failed, the card shows Last run failed.
- Click Run now on the card to add the task to the run queue.
- Open the card menu for View Details, Edit, Pause, Resume, and Delete. If you delete a task, Nextvisit also deletes its run history.
View executions
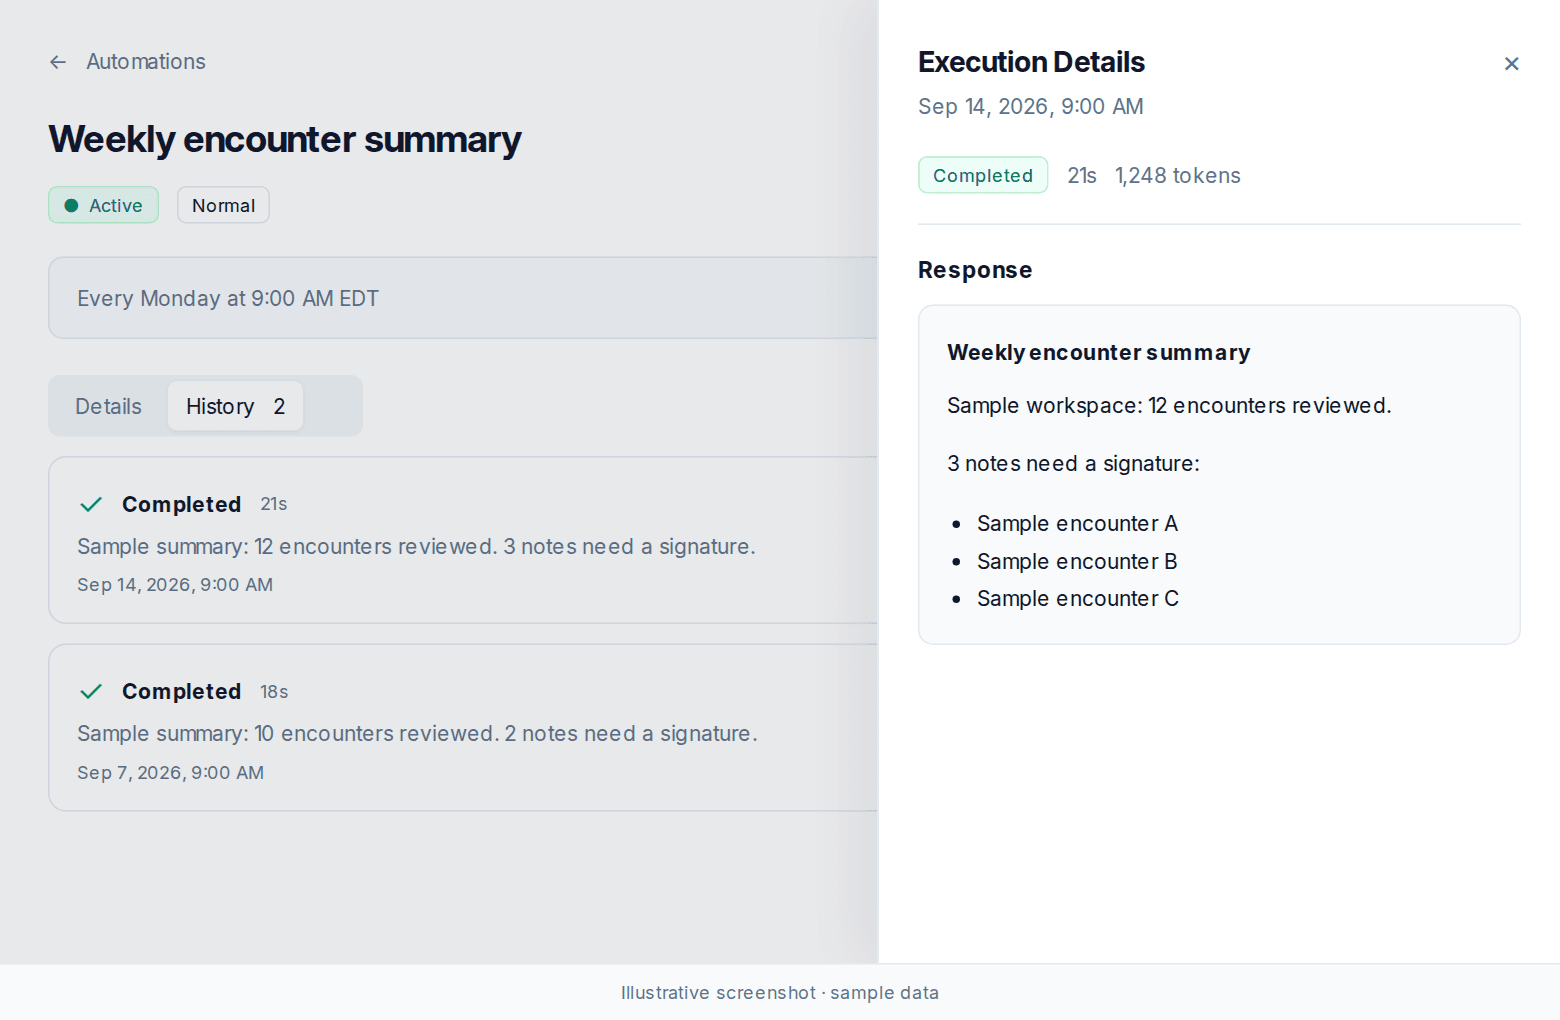
- Click View Details on a task. The Details tab shows the prompt.
- Open History to see runs. Each row shows a status, duration, and date. The statuses are Completed, Failed, Running, Pending, and Waiting for input.
- Click a run to open Execution Details. It shows status, duration, tokens, Response, and Attached Files. For an event run, it also shows Event Triggered. A failed run shows an error under Execution Failed.
Click Run Now on Details to add a run to the queue.
If a PDMP check needs a one-time code, the default AI run shows Waiting for a one-time code. Enter the One-time code. Then click Continue.
Was this article helpful?
Still stuck? Our team answers in the messenger.